
What (whom) are we going to trust?
Anyone worried about the ability of artificial intelligences (AI) to mimic reality is likely to be concerned by Nvidia’s latest offering: an image translation AI that will almost certainly have you second-guessing everything you see online.
In October, Nvidia demonstrated the ability of one of their AIs to generate disturbingly realistic images of completely fake people. Now, the tech company has produced one that can generate fake videos.
The AI does a surprisingly decent job of changing day into night, winter into summer, and house cats into cheetahs (and vice versa).
Best (or worst?) of all, the AI does it all with much less training than existing systems.
Like Nvidia’s face-generating AI, this image translation AI makes use of a type of algorithm called a generative adversarial network (GAN).
In a GAN, two neural networks work together by essentially working against each other. One of the networks generates an image or video, while the other critiques its work.
Typically, a GAN requires a significant amount of labeled data to learn how to generate its own data. For example, a system would need to see pairs of images showing what a street looked like with and without snow in order to generate either image on its own.
However, this new image translation AI developed by Nvidia researchers Ming-Yu Liu, Thomas Breuel, and Jan Kautz can imagine what a snow covered version of a street would look like without ever actually seeing it.
Trusting Your Own Eyes
Liu told The Verge that the team’s research is being shared with Nvidia’s product teams and customers, and while he said he couldn’t comment on how quickly or to what extent the AI would be adopted, he did note that there are several interesting potential applications.
“For example, it rarely rains in California, but we’d like our self-driving cars to operate properly when it rains,” he said.
“We can use our method to translate sunny California driving sequences to rainy ones to train our self-driving cars.”
Beyond such practical applications, the tech could have whimsical ones as well. Imagine being able to see how your future home might look in the middle of winter when shopping for houses, or what a potential outdoor wedding location will look like in the fall when leaves blanket the ground.
That said, such technology could have nefarious uses as well. If widely adopted, our ability to trust any video or image based solely on what our eyes tell us would be greatly diminished.
(this is more simply doing inverse graphics – but the snow add-on above is scary — TJACK)
Video evidence could become inadmissible in court, and fake news could become even more prevalent online as real videos become indistinguishable from those generated by AI.
Of course, right now, the capabilities of this AI are limited to just a few applications, and until it makes its way into consumer hands, we have no way of telling how it will impact society as a whole.
For now, we can only hope that the potential of this tech incites discussions about AI and proper regulation because, clearly, the impact of AI is going reach well beyond the job market.
This article was originally published by Futurism. Read the original article.
from: http://www.sciencealert.com/nvidia-ai-translation-software-fake-videos
NVIDIA Introduces Fake People Generated by AI
Chipmaker NVIDIA has developed an AI that produces highly detailed images of human-looking faces, but the people depicted don’t actually exist. The system is the latest example of how AI is blurring the line between the “real” and the fabricated.

Better Than Doodles
Back in June, an image generator that could turn even the crudest doodle of a face into a more realistic looking image made the rounds online. That system used a fairly new type of algorithm called a generative adversarial network (GAN) for its AI-created faces, and now, chipmaker NVIDIA has developed a system that employs a GAN to create far most realistic-looking images of people.
Artificial neural networks are systems developed to mimic the activity of neurons in the human brain. In a GAN, two neural networks are essentially pitted against one another. One of the networks functions as a generative algorithm, while the other challenges the results of the first, playing an adversarial role.
As part of their expanded applications for artificial intelligence, NVIDIA created a GAN that used CelebA-HQ’s database of photos of famous people to generate images of people who don’t actually exist. The idea was that the AI-created faces would look more realistic if two networks worked against each other to produce them.
First, the generative network would create an image at a lower resolution. Then, the discriminator network would assess the work. As the system progressed, the programmers added new layers dealing with higher-resolution details until the GAN finally generated images of “unprecedented quality,” according to the NVIDIA team’s paper.
Human or Machine?
NVIDIA released a video of their GAN in action, and the AI-created faces are both absolutely remarkable and incredibly eerie. If the average person didn’t know the faces were machine-generated, they could easily believe they belonged to living people.
Indeed, this blurring of the line between the human and the machine-generated is a topic of much discussion within the realm of AI, and NVIDIA’s GAN isn’t the first artificial system to convincingly mimic something human.
A number of AIs use deep learning techniques to produce human-sounding speech. Google’s DeepMind has WaveNet, which can now copy human speech almost perfectly. Meanwhile, startup Lyrebird’s algorithm is able to synthesize a human’s voice using just a minute of audio.
Even more disturbing or fascinating — depending on your perspective on the AI debate — are AI robots that can supposedly understand and express human emotion. Examples of those include Hanson Robotics’ Sophia and SoftBank’s Pepper.
Clearly, an age of smarter machines is upon us, and as the ability to AI to perform tasks previously only human beings could do improves, the line between human and machine will continue to blur. Now, the only question is if it will eventually disappear altogether.
from: https://futurism.com/these-people-never-existed-they-were-made-by-an-ai/
Generative Adversarial Networks (GAN)
for Beginners
Build a neural network that learns to generate handwritten digits.
Practical Generative Adversarial Networks for Beginners
You can download and modify the code from this tutorial on GitHub here.
According to Yann LeCun, “adversarial training is the coolest thing since sliced bread.” Sliced bread certainly never created this much excitement within the deep learning community. Generative adversarial networks—or GANs, for short—have dramatically sharpened the possibility of AI-generated content, and have drawn active research efforts since they were first described by Ian Goodfellow et al. in 2014.
GANs are neural networks that learn to create synthetic data similar to some known input data. For instance, researchers have generated convincing images from photographs of everything from bedrooms to album covers, and they display a remarkable ability to reflect higher-order semantic logic.
Those examples are fairly complex, but it’s easy to build a GAN that generates very simple images. In this tutorial, we’ll build a GAN that analyzes lots of images of handwritten digits and gradually learns to generate new images from scratch—essentially, we’ll be teaching a neural network how to write.

Sample images from the generative adversarial network that we’ll build in this tutorial. During training, it gradually refines its ability to generate digits.
GAN architecture
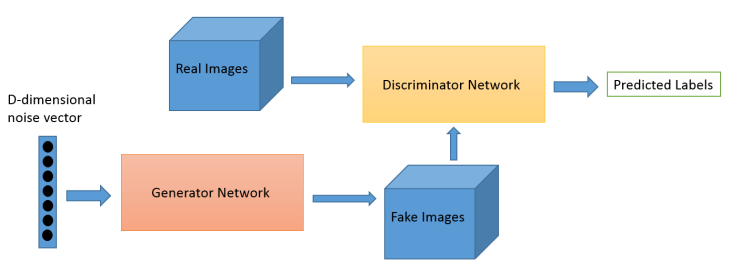
Generative adversarial networks consist of two models: a generative model and a discriminative model.
The discriminator model is a classifier that determines whether a given image looks like a real image from the dataset or like an artificially created image. This is basically a binary classifier that will take the form of a normal convolutional neural network (CNN).
The generator model takes random input values and transforms them into images through a deconvolutional neural network.
Over the course of many training iterations, the weights and biases in the discriminator and the generator are trained through backpropagation. The discriminator learns to tell “real” images of handwritten digits apart from “fake” images created by the generator. At the same time, the generator uses feedback from the discriminator to learn how to produce convincing images that the discriminator can’t distinguish from real images.
Getting started
We’re going to create a GAN that will generate handwritten digits that can fool even the best classifiers (and humans too, of course). We’ll use TensorFlow, a deep learning library open-sourced by Google that makes it easy to train neural networks on GPUs.
This tutorial expects that you’re already at least a little bit familiar with TensorFlow. If you’re not, we recommend reading “Hello, TensorFlow!” or watching the “Hello, Tensorflow!” interactive tutorial on Safari before proceeding.
Loading MNIST data
We need a set of real handwritten digits to give the discriminator a starting point in distinguishing between real and fake images. We’ll use MNIST, a benchmark dataset in deep learning. It consists of 70,000 images of handwritten digits compiled by the U.S. National Institute of Standards and Technology from Census Bureau employees and high school students.
Let’s start by importing TensorFlow along with a couple of other helpful libraries. We’ll also import our MNIST images using a TensorFlow convenience function called read_data_sets.

The MNIST variable we created above contains both the images and their labels, divided into a training set called train and a validation set called validation. (We won’t need to worry about the labels in this tutorial.) We can retrieve batches of images by calling next_batch on mnist. Let’s load one image and look at it.
The images are initially formatted as a single row of 784 pixels. We can reshape them into 28 x 28 pixel images and view them using PyPlot.

If you run the cell above again, you’ll see a different image from the MNIST training set.
Discriminator network
Our discriminator is a convolutional neural network that takes in an image of size 28 x 28 x 1 as input and returns a single scalar number that describes whether or not the input image is “real” or “fake”—that is, whether it’s drawn from the set of MNIST images or generated by the generator.

The structure of our discriminator network is based closely on TensorFlow’s sample CNN classifier model. It features two convolutional layers that find 5×5 pixel features, and two “fully connected” layers that multiply weights by every pixel in the image.
To set up each layer, we start by creating weight and bias variables through tf.get_variable. Weights are initialized from a truncated normal distribution, and biases are initialized at zero.
tf.nn.conv2d() is TensorFlow’s standard convolution function. It takes 4 arguments. The first is the input volume (our 28 x 28 x 1 images in this case). The next argument is the filter/weight matrix. Finally, you can also change the stride and padding of the convolution. Those two values affect the dimensions of the output volume.
If you’re already comfortable with CNNs, you’ll recognize this as a simple binary classifier—nothing fancy.


Now that we have our discriminator defined, let’s take a look at the generator model. We’ll base the overall structure of our model on a simple generator published by Tim O’Shea.
You can think of the generator as a kind of reverse convolutional neural network. A typical CNN like our discriminator network transforms a 2- or 3-dimensional matrix of pixel values into a single probability. A generator, however, takes a d-dimensional vector of noise and upsamples it to become a 28 x 28 image. ReLU and batch normalization are used to stabilize the outputs of each layer.
In our generator network, we use three convolutional layers along with interpolation until a 28 x 28 pixel image is formed. (Actually, as you’ll see below, we’ve taken care to form 28 x 28 x 1 images; many TensorFlow tools for dealing with images anticipate that the images will have some number of channels—usually 1 for greyscale images or 3 for RGB color images.)
At the output layer we add a tf.sigmoid() activation function; this squeezes pixels that would appear grey toward either black or white, resulting in a crisper image.


Generating a sample image
Now we’ve defined both the generator and discriminator functions. Let’s see what a sample output from an untrained generator looks like.
We need to open a TensorFlow session and create a placeholder for the input to our generator. The shape of the placeholder will be None x z_dimensions. The None keyword means that the value can be determined at session runtime. We normally have None as our first dimension so that we can have variable batch sizes. (With a batch size of 50, the input to the generator would be 50 x 100). With the None keywoard, we don’t have to specify batch_size until later.

Now, we create a variable (generated_image_output) that holds the output of the generator, and we’ll also initialize the random noise vector that we’re going to use as input. The np.random.normal() function has three arguments. The first and second define the mean and standard deviation for the normal distribution (0 and 1 in our case), and the third defines the the shape of the vector (1 x 100).

Next, we initialize all the variables, feed our z_batch into the placeholder, and run the session.
The sess.run() function has two arguments. The first is called the “fetches” argument; it defines the value you’re interested in computing. In our case, we want to see what the output of the generator is. If you look back at the last code snippet, you’ll see that the output of the generator function is stored in generated_image_output, so we’ll use generated_image_output for our first argument.
The second argument takes a dictionary of inputs that are substituted into the graph when it runs. This is where we feed in our placeholders. In our example, we need to feed our z_batch variable into the z_placeholder that we defined earlier. As before, we’ll view the image by reshaping it to 28 x 28 pixels and show it with PyPlot.

That looks like noise, right? Now we need to train the weights and biases in the generator network to convert random numbers into recognizable digits. Let’s look at loss functions and optimization!
Training a GAN
One of the trickiest parts of building and tuning GANs is that they have two loss functions: one that encourages the generator to create better images, and the other that encourages the discriminator to distinguish generated images from real images.
We train both the generator and the discriminator simultaneously. As the discriminator gets better at distinguishing real images from generated images, the generator is able to better tune its weights and biases to generate convincing images.
Here are the inputs and outputs for our networks.

So, let’s first think about what we want out of our networks. The discriminator’s goal is to correctly label real MNIST images as real (return a higher output) and generated images as fake (return a lower output). We’ll calculate two losses for the discriminator: one loss that compares Dx and 1 for real images from the MNIST set, as well as a loss that compares Dg and 0 for images from the generator. We’ll do this with TensorFlow’s tf.nn.sigmoid_cross_entropy_with_logits() function, which calculates the cross-entropy losses between Dx and 1 and between Dg and 0.
sigmoid_cross_entropy_with_logits operates on unscaled values rather than probability values from 0 to 1. Take a look at the last line of our discriminator: there’s no softmax or sigmoid layer at the end. GANs can fail if their discriminators “saturate,” or become confident enough to return exactly 0 when they’re given a generated image; that leaves the discriminator without a useful gradient to descend.
The tf.reduce_mean() function takes the mean value of all of the components in the matrix returned by the cross-entropy function. This is a way of reducing the loss to a single scalar value, instead of a vector or matrix.

Now let’s set up the generator’s loss function. We want the generator network to create images that will fool the discriminator: the generator wants the discriminator to output a value close to 1 when it’s given an image from the generator. Therefore, we want to compute the loss between Dg and 1.

Now that we have our loss functions, we need to define our optimizers. The optimizer for the generator network needs to only update the generator’s weights, not those of the discriminator. Likewise, when we train the discriminator, we want to hold the generator’s weights fixed.
In order to make this distinction, we need to create two lists of variables, one with the discriminator’s weights and biases, and another with the generator’s weights and biases. This is where naming all of your TensorFlow variables with a thoughtful scheme can come in handy.

Next, we specify our two optimizers. Adam is usually the optimization algorithm of choice for GANs; it utilizes adaptive learning rates and momentum. We call Adam’s minimize function and also specify the variables that we want it to update—the generator’s weights and biases when we train the generator, and the discriminator’s weights and biases when we train the discriminator.
We’re setting up two different training operations for the discriminator here: one that trains the discriminator on real images and one that trains the discrmnator on fake images. It’s sometimes useful to use different learning rates for these two training operations, or to use them separately to regulate learning in other ways.

It can be tricky to get GANs to converge, and moreover they often need to train for a very long time. TensorBoard is useful for tracking the training process; it can graph scalar properties like losses, display sample images during training, and illustrate the topology of the neural networks.
If you run this script on your own machine, include the cell below. Then, in a terminal window, run tensorboard --logdir=tensorboard/ and open TensorBoard by visiting http://localhost:6006 in your web browser.

And now we iterate. We begin by briefly giving the discriminator some initial training; this helps it develop a gradient that’s useful to the generator.
Then we move on to the main training loop. When we train the generator, we’ll feed a random z vector into the generator and pass its output to the discriminator (this is the Dg variable we specified earlier). The generator’s weights and biases will be updated in order to produce images that the discriminator is more likely to classify as real.
To train the discriminator, we’ll feed it a batch of images from the MNIST set to serve as the positive examples, and then train the discriminator again on generated images, using them as negative examples. Remember that as the generator improves its output, the discriminator continues to learn to classify the improved generator images as fake.
Because it takes a long time to train a GAN, we recommend not running this code block if you’re going through this tutorial for the first time. Instead, follow along but then run the following code block, which loads a pre-trained model for us to continue the tutorial.
If you want to run this code yourself, prepare to wait: it takes about 3 hours on a fast GPU, but could take ten times that long on a desktop CPU.


Because it can take so long to train a GAN, we recommend that you skip the cell above and execute the following cell. It loads a model that we’ve already trained for several hours on a fast GPU machine, and lets you experiment with the output of a trained GAN.


Training difficulties
GANs are notoriously difficult to train. Without the right hyperparameters, network architecture, and training procedure, the discriminator can overpower the generator, or vice-versa.
In one common failure mode, the discriminator overpowers the generator, classifying generated images as fake with absolute certainty. When the discriminator responds with absolute certainty, it leaves no gradient for the generator to descend. This is partly why we built our discriminator to produce unscaled output rather than passing its output through a sigmoid function that would push its evaluation toward either 0 or 1.
In another common failure mode, known as mode collapse, the generator discovers and exploits some weakness in the discriminator. You can recognize mode collapse in your GAN if it generates many very similar images regardless of variation in the generator input z. Mode collapse can sometimes be corrected by “strengthening” the discriminator in some way—for instance, by adjusting its training rate or by reconfiguring its layers.
Researchers have identified a handful of “GAN hacks” that can be helpful in building stable GANs.
Closing thoughts
GANs have tremendous potential to reshape the digital world that we interact with every day. The field is still very young, and the next great GAN discovery could be yours!
Other resources
- The original GAN paper by Ian Goodfellow and his collaborators, published in 2014
- A more recent tutorial by Goodfellow that explains GANs in somewhat more accessible terms
- A paper by Alec Radford, Luke Metz, and Soumith Chintala that introduces deep convolutional GANs, whose basic structure we use in our generator in this tutorial. Also see their DCGAN code on GitHub.
This post is part of a collaboration between O’Reilly and TensorFlow. See our statement of editorial independence.
from: https://www.oreilly.com/learning/generative-adversarial-networks-for-beginners
You must be logged in to post a comment.